Exporting leads from LinkedIn Sales Navigator into Excel or CSV is a crucial step for professionals looking to optimize their sales processes. By transferring your lead data into an accessible format, you can streamline your outreach efforts, integrate leads into your CRM, and perform in-depth analysis to improve your targeting. For more details, see our guide on Mastering LinkedIn Sales Navigator Analytics: Boost Sales Performance.
In this guide, we’ll walk you through how to export LinkedIn Sales Navigator leads, covering everything from basic steps to advanced techniques that will help you manage and leverage your data more effectively.
Why Export Sales Navigator Data?
Exporting data from LinkedIn Sales Navigator provides valuable insights and enhances various aspects of your sales and marketing efforts.
Here’s why exporting this data can be crucial:
1. Enhanced Personalization: Exported profile data allows you to create highly personalised email outreach and communications based on detailed insights into each contact’s background and interests.
2. Targeted Campaigns: By filtering and exporting profiles, you can refine your target audience for campaigns, ensuring your messaging reaches the most relevant prospects.
3. CRM Integration: Seamlessly import exported data into CRM systems to consolidate contact information, streamline lead management, and maintain up-to-date records.
4. AI and Data Science Applications: Use the exported data to train AI models or perform advanced analytics, improving targeting accuracy and driving more effective engagement strategies.
5. Strategic Insights: Access and manipulate exported data to generate custom reports and visualisations, providing deeper insights into your lead generation and sales processes.
6. Backup and Accessibility: Keep an offline copy of your data for reliable backup and ensure that you can access important information even without an internet connection.
Exporting Sales Navigator data maximises its utility by enhancing personalization, targeting, analysis, and integration, ultimately supporting more effective sales and marketing efforts.
Did you know that companies using data-driven personalization see a 5-15% increase in revenue? (Source: McKinsey). Exporting your Sales Navigator data allows you to tap into this potential by enabling hyper-personalized outreach. For example, you can segment your leads based on industry, company size, or job title, and then tailor your messaging to address their specific needs and pain points. This targeted approach significantly increases engagement and conversion rates.
When you export sales data from LinkedIn Sales Navigator, you unlock a wealth of opportunities to refine your sales strategies. The ability to extract detailed lead information allows sales teams to identify key trends, understand customer behaviors, and tailor their approaches for maximum impact. By using a tool like Scrupp, the export sales process becomes streamlined, enabling you to focus on analyzing the data rather than struggling with manual extraction. This can lead to more effective targeting, improved conversion rates, and ultimately, increased revenue. The data obtained when you export sales information can also be used to train AI models, providing even more sophisticated insights into your sales processes.
To further illustrate the impact, consider a case study: A SaaS company used Scrupp to export lead lists from Sales Navigator, enriching the data with additional information and integrating it into their CRM. They saw a 30% increase in qualified leads and a 20% reduction in sales cycle time. This demonstrates the tangible benefits of efficiently managing and leveraging your Sales Navigator data.
It's important to note that LinkedIn Sales Navigator does not offer a direct, native "export to CSV" button for your saved lead or account lists. While you can save searches and lists within Sales Navigator, extracting this data for external use (like CRM integration or advanced analysis) typically requires the use of third-party tools or manual methods, which can be time-consuming and prone to errors. This limitation is why tools like Scrupp and others have become essential for sales professionals looking to fully leverage their Sales Navigator data.
Step-by-Step Guide to Exporting Leads
This guide provides simple, step-by-step instructions to move your data into Excel or CSV formats, making it easier to manage and analyse your leads.
Alternative Methods for Exporting Sales Navigator Data
While this guide focuses on using Scrupp for its streamlined process, it's beneficial to be aware of other methods and tools available for exporting LinkedIn Sales Navigator data. Each option has its own set of advantages and considerations:
| Method/Tool | Description | Pros | Cons | Best For |
|---|---|---|---|---|
| Scrupp | Dedicated LinkedIn lead generation and data scraping tool, specifically designed for Sales Navigator and LinkedIn. | User-friendly, verified email extraction, CSV enrichment, Apollo.io integration. | Primarily focused on LinkedIn/Apollo.io ecosystem. | Users needing comprehensive LinkedIn/Sales Navigator data and email verification. |
| Evaboot | A Chrome extension specifically built to export and clean LinkedIn Sales Navigator leads. | Easy to use, cleans data, verifies emails, integrates with CRMs. | Requires Chrome, subscription model, focused solely on Sales Navigator. | Sales professionals wanting clean, verified Sales Navigator data with minimal setup. |
| Phantombuster | A general-purpose automation and data extraction platform with "Phantoms" for various social media and web scraping tasks, including LinkedIn. | Highly versatile, automates many tasks, cloud-based, supports various platforms. | Can have a steeper learning curve, less specific to Sales Navigator than other tools. | Users with diverse automation needs beyond just Sales Navigator export. |
| Manual Copy-Pasting | Copying individual profile details directly from Sales Navigator pages. | Free, no tools required. | Extremely time-consuming, highly prone to errors, not scalable, violates LinkedIn's terms of service for bulk extraction. | Very small, one-off data points (not recommended for lists). |
Many users often ask, "How do I export contacts from LinkedIn Sales Navigator efficiently?" The answer lies in utilizing tools designed to simplify this process. Manually copying and pasting contact information is time-consuming and prone to errors. Scrupp provides a user-friendly solution to export contacts directly into a CSV or Excel format, saving you valuable time and effort. With Scrupp, the question of "how do I export contacts" becomes a simple, one-click solution, allowing you to focus on leveraging your network and nurturing relationships rather than struggling with data management.
Here are a few tips for efficient contact management after you export leads LinkedIn Sales Navigator:
- Data Cleaning: Always clean your data after exporting to remove duplicates and correct any errors.
- Segmentation: Segment your leads based on relevant criteria (industry, job title, location) for targeted outreach.
- CRM Integration: Integrate your exported data with your CRM system to streamline your sales process.
- Regular Updates: Regularly update your exported data to ensure accuracy and relevance.
We’ll cover how to export both lead and account lists using a Sales Navigator account list scraper and a Saved leads scraper for SalesNav, so you can effectively leverage your data.
While this article focuses on exporting data from LinkedIn Sales Navigator, it's worth noting that the ability to export data to CSV is valuable across various platforms. If you're also working with Airtable, you might be wondering how to export Airtable to CSV. The process is generally straightforward within Airtable itself, allowing you to download your data for use in other applications or for analysis. Understanding how to export Airtable to CSV, along with exporting from Sales Navigator, gives you greater control over your data and allows you to integrate information from different sources. Just as Scrupp streamlines the Sales Navigator export, Airtable provides its own method for how to export Airtable to CSV, ensuring data portability.
We’ll be using the Scrupp tool for this process. If you don’t have an account yet, you can sign up for free here to get started.
B) Choose Export Format: Select whether you want to export list to Excel (XLSX) or CSV format based on your needs. CSV is generally preferred for larger datasets and compatibility with various tools.
C) Start Export: Click the export button to initiate the data extraction. Scrupp will automatically gather the lead information from Sales Navigator and format it into your chosen format.
While Sales Navigator is excellent for targeted lead generation, you might also want to download LinkedIn connections from your general LinkedIn network. LinkedIn provides a feature to download LinkedIn connections as a CSV file, which includes basic information like name, email, and company. This can be a useful way to maintain a backup of your network or to import your connections into a different system. However, keep in mind that the data available when you download LinkedIn connections is typically less detailed than what you can extract from Sales Navigator using Scrupp. Sales Navigator provides richer profile data, making it more suitable for in-depth sales and marketing efforts.
1) How To Export Lead Lists from LinkedIn Sales Navigator
Exporting lead lists from LinkedIn Sales Navigator is a straightforward process when using Scrupp.
Follow these steps to get your data efficiently:
Step 1: SignUp for Scrupp
Start by creating an account on the Scrupp website. The registration process is simple and quick, allowing you to get started without delay.
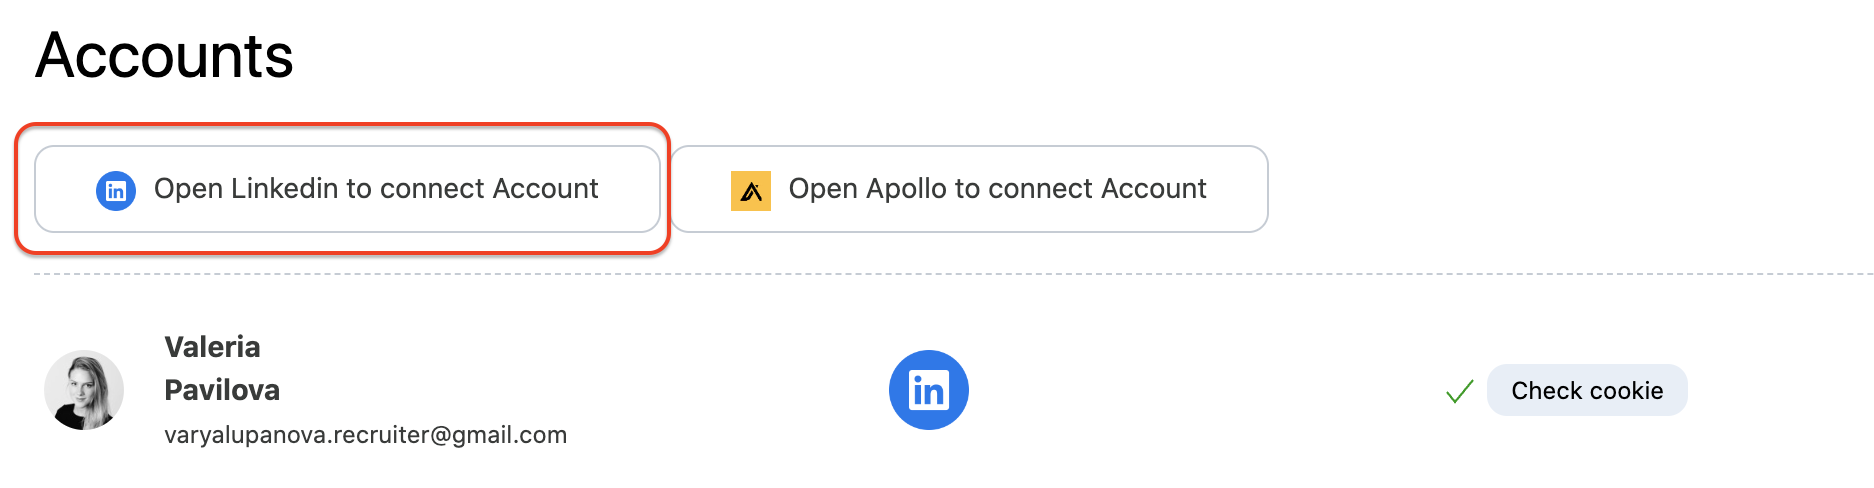
Step 2: Connect Your LinkedIn Account
After signing up, connect your LinkedIn account to Scrupp. This integration is essential as it enables Scrupp to access and export your Sales Navigator search results.
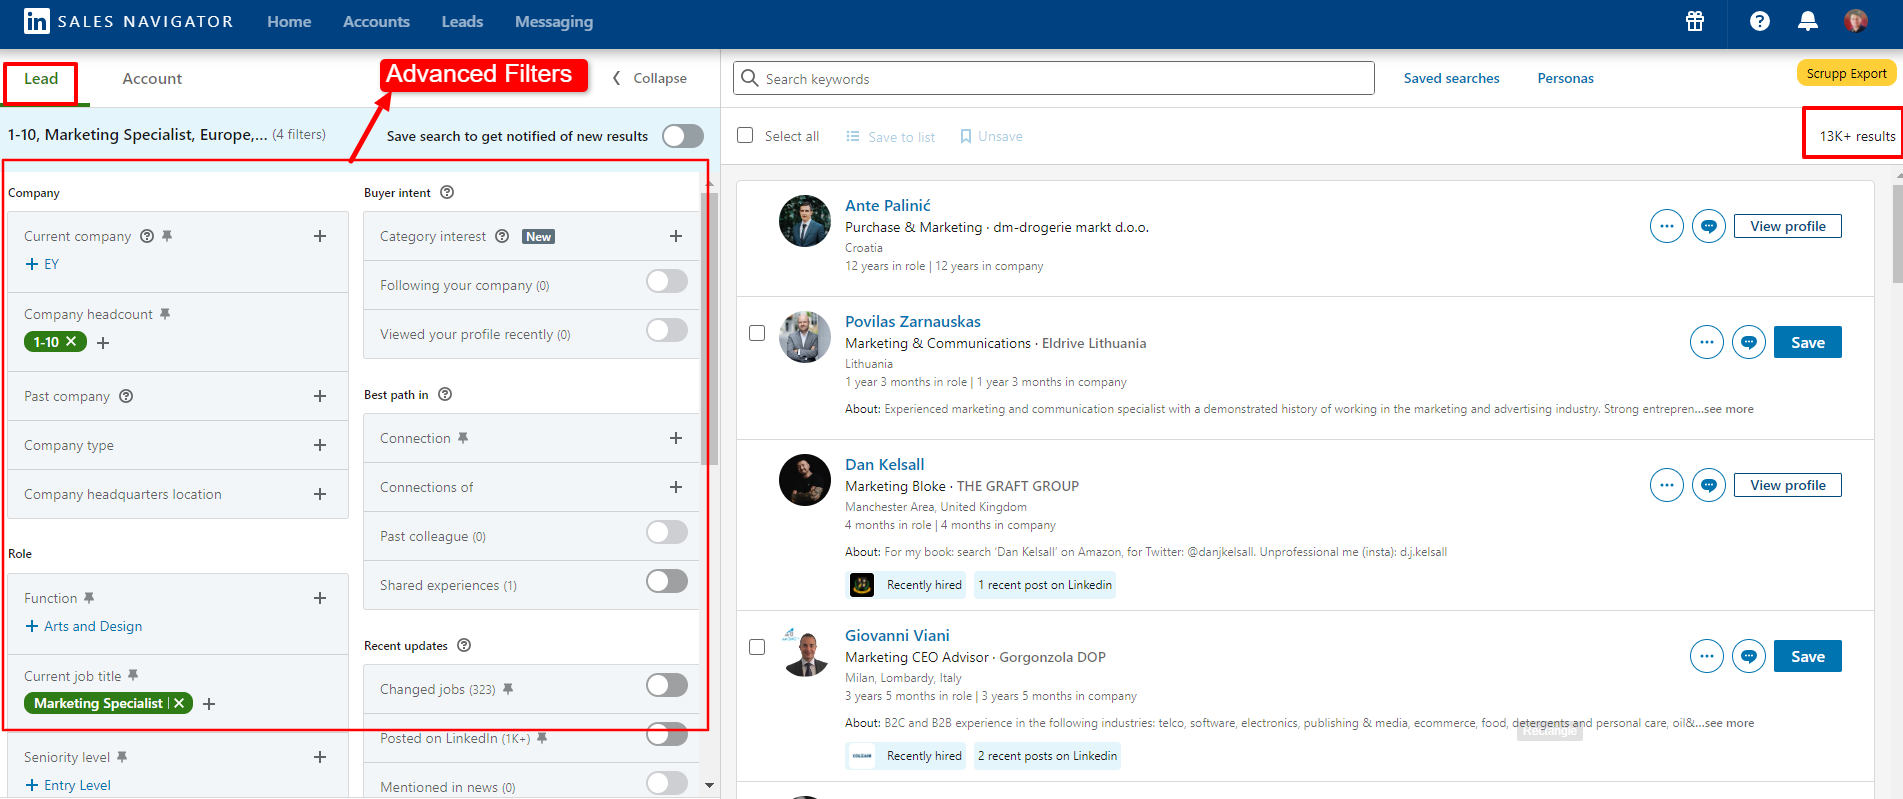
Step 3: Perform Your Sales Navigator Search
Log into LinkedIn Sales Navigator and run the search you wish to export. Apply the necessary filters to refine your results, ensuring you target the most relevant contacts and companies.
Step 4: Export Search Results with Scrupp
Once your search is complete, switch back to Scrupp to begin the export process. Here’s how:
A) Select the Search Results: Choose the specific search results you want to export.
Want to enrich your Sales Navigator leads?
Add verified emails and phone numbers to any SN export automatically.
Related Tools & Guides
- Export LinkedIn to Excel — Free Tool
- Google Sheets Integration
- HubSpot Integration
- Pipedrive Integration
- Webhook Integration
- LinkedIn Scraper
- Sales Navigator Scraper
- LinkedIn Email Finder
- Free Email Verifier
- B2B Data Enrichment
- How to export 2,500+ leads from Sales Navigator
- How to find CEO email on LinkedIn
- How to deduplicate lead lists
- How to verify emails before outreach
- Evaboot Alternative
- PhantomBuster Alternative